I recently resized our dev and production environment AWS EC2 volumes and these are some notes I made while doing it. It’s specific to a LAMP stack but the process could be generally useful too.
Posting here for posterities sake and if it’s helpful for anyone else.
Certainly this is not a full and exhaustive list of todo’s and possibilities but it should give you a good idea of the process.
This has to be done when no-one is using the app as it involves shutting down Apache and other services which may be using the volume.
Review cron jobs well before you start and stop any which may be running when you’re planning on resizing.
Stop Apache
sudo service apache2 stopand Solrsudo /etc/init.d/jetty stopand anything else that uses files on the volume. If yourMYSQLserver is on the same server as the volume you are restarting:sudo /etc/init.d/mysql stop.sudo sync && sleep 10 && sudo umount -l /srv— The-lallows any processes to finish before unmounting. I needed to do this as there were processes which kept on popping up after killing them.- Use
fuser(fuser) to see and kill any processes which are using the volume. sync(sync) – will process and return done once the device reports that the transfer has completed.unmount(unmount) the volume you are resizing.unmountis a kernel action that makes that device no longer accessible as a file system but it’s still accessible via ssh.
- Use
Now fsck (filesystem consistency check and interactive repair) the old volume.
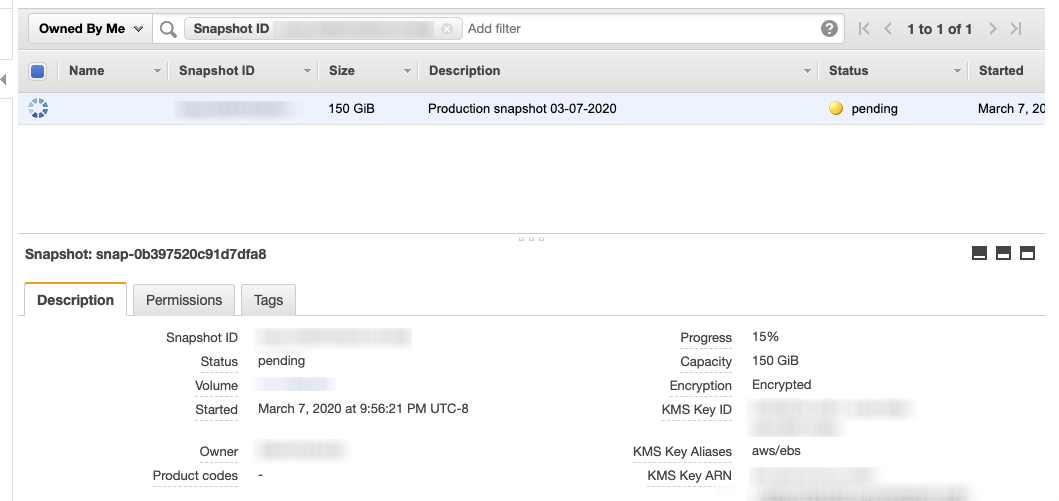
Take a snapshot of the volume in the AWS console (note the size for the next step). This can take some time and you will get a misleading ui saying ‘complete’. If you click the link in the ui to view the snapshot you can see it’s status and progress as in the screenshot below. If you try and create a new volume based on an incomplete snapshot it will come up in the UI dropdown to select a snapshot, but it won’t let you do it because it’s not complete.

When the volume is snapshotted, create a new volume, larger in size than the existing volume, using the snapshot you just created.
- When clicking the create volume button and searching from a dropdown for new snapshot.
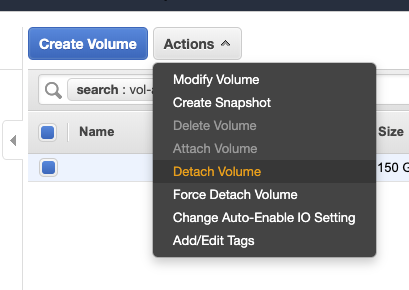
- Another option was to select the snapshot in the snapshot UI and select “Create Volume” from the Actions dropdown. This brought up the create volume page with the snapshot selected.
Detach the existing volume in the AWS console from the instance.
If you want to keep the same device name
/dev/xvdbthen you’ll need to delete the old volume now. Otherwise use a different device name and be sure to change the/etc/fstabfile.Attach the new volume to the instance in the AWS console.
Grow the filesystem on the new volume to fit it’s larger, fitter, happier, and more productive volume.
You may have to fdisk
I didn’t need to use
fdiskso I don’t have examples right now. You can view and see if you have partitions like this:$ lsblk NAME MAJ:MIN RM SIZE RO TYPE MOUNTPOINT xvda 202:0 0 8G 0 disk └─xvda1 202:1 0 8G 0 part / xvdb 202:16 0 150G 0 disk /srvsudo resize2fs /dev/xvdb
fsck the resized volume
fsck /dev/xvdb``` The exit code returned by fsck is the sum of the following conditions: 0 - No errors 1 - File system errors corrected 2 - System should be rebooted 4 - File system errors left uncorrected 8 - Operational error 16 - Usage or syntax error 32 - Fsck canceled by user request 128 - Shared library error ```Mount/Attach the resized volume.
sudo mount /dev/xvdb /srv
Restart services:
- Apache
sudo service apache2 restart - Solr
sudo /etc/init.d/jetty restart - MySQL
sudo /etc/init.d/mysql restart
- Apache
Test the site out, make sure everything seems copacetic.
Keep the snapshot of the old volume for a week and a half, set a reminder to delete it!
Delete the old volume if you haven’t already from step 7. stop
and Solrsudo /etc/init.d/jetty stopand anything else that uses files on the volume. If yourMYSQLserver is on the same server as the volume you are restarting:sudo /etc/init.d/mysql stop`.sudo sync && sleep 10 && sudo umount -l /srv— The-lallows any processes to finish before unmounting. I needed to do this as there were processes which kept on popping up after killing them.- Use
fuser(fuser) to see and kill any processes which are using the volume. sync(sync) – will process and return done once the device reports that the transfer has completed.unmount(unmount) the volume you are resizing.unmountis a kernel action that makes that device no longer accessible as a file system but it’s still accessible via ssh.
- Use
Now fsck (filesystem consistency check and interactive repair) the old volume.
Take a snapshot of the volume in the AWS console (note the size for the next step). This can take some time and you will get a misleading ui saying ‘complete’. If you click the link in the ui to view the snapshot you can see it’s status and progress as in the screenshot below. If you try and create a new volume based on an incomplete snapshot it will come up in the UI dropdown to select a snapshot, but it won’t let you do it because it’s not complete.
When the volume is snapshotted, create a new volume, larger in size than the existing volume, using the snapshot you just created.
- When clicking the create volume button and searching from a dropdown for new snapshot.
- Another option was to select the snapshot in the snapshot UI and select “Create Volume” from the Actions dropdown. This brought up the create volume page with the snapshot selected.
Detach the existing volume in the AWS console from the instance.
If you want to keep the same device name
/dev/xvdbthen you’ll need to delete the old volume now. Otherwise use a different device name and be sure to change the/etc/fstabfile.Attach the new volume to the instance in the AWS console.
Grow the filesystem on the new volume to fit it’s larger, fitter, happier, and more productive volume.
- You may have to fdisk — I didn’t need to use
fdiskso I don’t have examples right now. You can view and see if you have partitions like this:
- You may have to fdisk — I didn’t need to use

$ lsblk
NAME    MAJ:MIN RM   SIZE RO TYPE MOUNTPOINT
xvda    202:0    0     8G  0 disk
└─xvda1 202:1    0     8G  0 part /
xvdb    202:16   0   150G  0 disk /srv
- [resize2fs](https://linux.die.net/man/8/resize2fs) ([aws example](https://docs.aws.amazon.com/AWSEC2/latest/UserGuide/recognize-expanded-volume-linux.html#extend-linux-file-system)).
sudo resize2fs /dev/xvdb
- fsck the resized volume
fsck /dev/xvdb
The exit code returned by fsck is the sum of the following conditions:
0 - No errors
1 - File system errors corrected
2 - System should be rebooted
4 - File system errors left uncorrected
8 - Operational error
16 - Usage or syntax error
32 - Fsck canceled by user request
128 - Shared library error
- Mount/Attach the resized volume.
sudo mount /dev/xvdb /srv
- Restart services:
- Apache
sudo service apache2 restart - Solr
sudo /etc/init.d/jetty restart - MySQL
sudo /etc/init.d/mysql restart
- Apache
- Test the site out, make sure everything seems copacetic.
- Keep the snapshot of the old volume for a week and a half, set a reminder to delete it!
- Delete the old volume if you haven’t already from step 7.